Bear’s Paw Succulent and Hugs, Thinking of You, Paw-some Friend Cards

Hello all! I’ve found another old post in my ‘drafts’ folder and have finally gotten it polished off for you… These were some sweet gift sets I made up last year when I found some ADORABLE Bear’s Paw succulents and put them in some cute cactus shot glasses from Dollar Tree and paired them with some stuffed bears and a handmade card to make some sweet and encouraging gift sets for some beary pawsome friends. First up a set for a special couple needing encouragement:

Awww! That sweet Pink & Main bouquet on the front of the card is colored with some fabulous shimmery Shuttle Art Gel Pens and a hand-drawn edge.

The inside has some cute Pink & Main stamps to match the gift, too…

I’m just head-over-paws in love with those darling bear’s paw succulents (Cotyledon tomentosa)! Aren’t they just TOO cute?!!

Of course, this post was done in March last year (I TOLD you I was backlogged!). Today I stopped by mom and dad’s and saw how much they have grown in such a short time:

This set went to a single friend, so there’s just one bear inside…


Supplies used:

  • Pink & Main stamp sets: Fur Ever, Grandma’s Lace, Mini Faces Set 1, and Thinking of You Always
  • Shuttle Art Gel Pens

And, I had this darling interlocking ‘hugs’ card for another friend:

Supplies used:

  • Concord & 9th Hugs Card die
  • Concord & 9th Cuddles & Hugs stamp set
  • Essentials by Ellen All Inside stamp & die and Bear Hugs die
  • DCWV The Butterfly Garden stack cardstock
  • Hero Arts ombre ink pads: ombre dolphin ; pink to red;
  • Tsukineko Memento Rich Coocoa dye ink
  • Copic Markers C1 E 13, 33, 71; R20

I hope you enjoyed these Pawsitively darling little treats!

~D.Ann

.

p.s. any ads on this page are placed by WordPress and are not endorsed by me.

pps: UPDATE: Dad finished his radiation treatments Friday. YAY!! Doc said it’ll probably take a couple of weeks for the side effects to resolve. She’ll see him in 5 weeks and then order tests – likely a PET scan – to be done at 8-10 weeks. Meanwhile he’s to exercise, eat well, exercise and stay healthy so his body can clear out all the irradiated cells. We’re looking forward t a good report!

Hope you’re all staying healthy and sane in these crazy times.😉


Neat & Tangled USPS Gift Wrap Ensemble

Good evening! I’m about tuckered out, but I want to get this post out, for the Neat & Tangled Throwdown challenge that is about to close, so here we go…

I really wanted to do something nice for my USPS postal carrier this year as she always trudges up to my apartment when there are packages rather than just leave them down at the mailboxes. She even asked about them one day as she saw they were art related and her teenage daughter is getting into arts & crafts. I know thy’re going to have a party when they get this as they LOVE chocolates!

I have been wanting to use the Neat & Tangled Truck die (thanks Miriam!!) but life has been so hectic, this was my first chance to pull it out. It’s darling and easy to put together the main truck. All the optional add-ons – especially those blinker lights – are a bit tiny for my big mits, tho. : ) I also wanted to wrap up a box of Ferrero Rocher chocolates extra elegantly. I’ve never used a die cut to wrap something before, but I thought the Neat & Tangled Doily Envelope die would make a gorgeous way to wrap it up… I was right! Check out the gift ensemble:

The card is a shaker. I framed it up with the edges of the Doily Envelope Die to tie the ensemble all together.

20181227_215022_wm

The envelope is lined with the same embossed wrapping paper as I used to wrap the chocolates. The truck opens up and holds tiny presents… in this case, a single Ferrero Rocher Chocolate! (hmm… now that I look at it, I think I’ll add some tissue paper in there to cushion it.)

It was a fun set to make I know she’s going to get a kick out of it! I can’t wait to make more of those adorable trucks – probably in UPS brown next time!!

Supplies:

  • Neat & Tangled Truck and Doily Envelope dies & Sweet Treats sentiments stamps
  • DCWV glitter card and chalkboard stack (black and gray sheets)
  • Core’dinations cardstock: white & black
  • Brother Sister Design Studio Embossed Foil Gift Wrap (wrapped chocolates and envelope liner)
  • Tsukineko Memento Tuxedo Black dye ink
  • Tombow Dual Brush Pens 565 &845
  • Sakura Gelly Roll pen – White 10
  • Ranger Inkssentials Glossy Accents (windows & headlights)
  • Blank Slate by Traditions open heart confetti (shaker)
  • Laura’s Loft Red Hot Love sequins (shaker)
  • Queen & Co Diamonds toppings (shaker)
  • Sookwang Scor-Tape
  • Simply Defined “Stay Put” adhesive and Simply Dimensional Foam Adhesive Sheets
  • Misc. glitter cardstock in red and orange; acetate; printed usps logo
  • Ferrero Rocher chocolates – both for the recipient and the crafter!! : )

I am playing along with the following challenges – click on any one for more information on how you can join the fun!

Ok, I’m off for a very late supper. Y’all have a lovely weekend!

~D.Ann

.

p.s. any ads on this page are placed by WordPress and are not endorsed by me.

Happily Ever After Fairy Tale Anniversary Tunnel Card – The Princess Bride

Surprise! Didn’t think I’d make it back again this year, but here I am! It’s anniversary party time (their 54th!) and I have a cool fairy tale tunnel card to share with you with some fun references from The Princess Bride!

The extra grass on the prince and princess’s levels was done by partially die cutting with a grass die. After it was put together I wanted to add the As You Wish sentiment, so I embossed it on acetate. Princess Bride fans know “As You Wish” means, “I love you!” Not a Princess Bride fan? INCONCEIVABLE!! (That means the rest of us are laughing at you right now! Lol!) I added the Happily Ever After after it was together, too.

This was my first time playing with these dies and I wasn’t sure how to color them. I started out with Aqua Blend pencils, but I wasn’t satisfied with the results (guess I need more practice!), so I went right over them with alcohol markers, which added to the shading and I was happier. Then I added a bunch of ‘gilding’ with some metallic markers and a Sparkle pen.

This was my first time using a concertina fold (the sides) to put together a tunnel card. Not as easy as it looks and hard to keep it from warping = I need more practice!!

Well, the picture of the back looked fine on my phone, but now it looks blurry. sorry. It’s already in the possession of the happy couple, so here are some of their favorite Princess Bride quotes that I used: “Mawage. Mawage is wot bwings us togever today.” “This is true love – You think this happens every day?” “INCONCEIVABLE!” “Have fun storming the castle!”

Supplies:

  • Crafter’s Companion Happily Ever After Create-A-Card die set
  • Crafter’s Companion Happily Ever After Edge’ables die
  • Impression Obsession Small Grass Border die
  • The Ink Road – As You Wish stamp set
  • Recollections 110# cardstock – white
  • Spectrum Noir by Crafter’s Companion Aqua Blend pencils: Beeswax, Blue Marine, Bottle Green, Bright Green, Brunette, Carrot, Cobalt Blue, Deep Forest, Dove Grey, Ginger, Honeycomb, Iron Grey, Oak, Oregano, Pesto Green, Sky Blue, Slate, Spinach, Strawberry,Verdant Green, Wheat
  • Spectrum Noir by Crafter’s Companion Basics permanent alcohol markers: Apple, Bamboo, Cerulean, Earth Brown, Emerald, Forest Green, Meadow, Natural Brown, Pale Citrus, Pecan, Silk, Willow
  • Spectrum Noir by Crafter’s Companion Metallic markers: Rare Minerals – Burnished CopperGold Plate, Silver Ingot; Precious Metals – Blue Topaz
  • Spectrum Noir by Crafter’s Companion Sparkle pen – clear
  • Tsukineko Versamark Ink
  • WoW! Gold Sparkle embossing powder
  • Tsukineko Memento Tuxedo Black ink
  • Sookwang Scor-tape double sided adhesive
  • Simply Defined ‘Stay Put’ glue
  • Misc. gold glitter cardstock and clear acetate

I’m playing along with the following challenges – click on any one of them for more information on how you can join the fun:

Thanks for stopping by and for sharing your comments!

It just might be next year before I post again, so y’all take care and Have fun stormin’ the castle!!

~D.Ann

.

p.s. any ads on this page are placed by WordPress and are not endorsed by me.


Hello My Favorite Nuts Acorn Shaker with Gift Card

Hello, again! I’m glad you’ve returned! Today’s card is a shaker with a surprise:

Those of you who follow me, may recall THIS card with a similar concealed surprise. I just love that the Spellbinders Die-of-the-Month acorn can be turned into a gift card holder for these fun acorn-shaped gift cards from that coffee shop that ends in BUCK$!

And the Queen & Company Happy Harvest Fall Kit has those fab acorn shakers to match. This time the shaker is filled with fabulous mini ‘gems.’ Observation: The gorgeous glitter paper in that kit is made so well that the glitter won’t rub off, but that also means it’s not really the best for intricate dies, like the Hello Fall insert of this acorn die. It simply doesn’t want to cut clear through. I recommend using it for non-intricate cutting. The leaf also gets added dimension when you score the veins. The acorns get some realistic color with a dauber and some Distress inks.

What else is behind that acorn?….

This darling family! I love that the two squirrels/chipmunks in the acorn are hugging, with coffee in hand… something that has led to many a spill in this family! And the mugs have kitty paw prints on them and a stuffed kitty is lying on the floor… another signature of our family. The sentiment: ‘You are my favorite nuts’ – ever so apropos! By cutting them out of separate cardstock, I was able to color them with Copics and not have them bleed through to the back of the card. It also allowed me to fussy cut around the arms and put them through the cup handles.

By the way… didja notice that acorns, just like humans, come in all varieties?! : )

Materials used:

  • Spellbinders Small Die of the Month – October 2018
  • Queen & Co.  Happy Harvest Fall Kit (dies, foam, clear plastic, paper, glitter paper and beads)
  • Neat & Tangled My Favorite Nut stamps & dies; Puppy’s Favorite Things stamps
  • Core’dinations cardstock: white, brown, kraft, yellow
  • Recollections card base
  • Tsukineko Memento Desert Sand dye ink
  • Ranger Tim Holtz Distress Inks: Spiced Marmalade, Rusty Hinge, Barn Door, Vintage Photo and Walnut Stain
  • Copic Markers: E13, 23, 25, 29, 31, 55, 71;Y38; YR02, 04, 07, 24; W1
  • Simply Defined Permanent adhesive runner & Stay-Put adhesive glue
  • Misc. ribbon and Starbucks gift card

I am playing along with the following hops and challenges. Be sure to click on them for more information on how you can play along and enter for prizes:

I’m so glad you stopped by! I enjoy reading your encouraging messages and greatly appreciate them!

~D.Ann

.

p.s. any ads on this page are placed by WordPress and are not endorsed by me.

Art Impressions Cat Twist Ties Cuddle Cats Group Hug Gate Fold Card and Construction Tips

Yes, another cat card! This one was supposed to have made the Cat Lovers Hop, but the company I’d ordered the stamp set from goofed and sent me the wrong set and the correct one didn’t arrive until after the hop was done. (FYI, it wasn’t Art Impressions, this was before they had this set up on their site) I still needed to make up the card I had planned, so here we are. : )

This stamp set is SO us, I just HAD to get it to make first and foremost for the other special folks in my favorite group hug pack! And, you know me… I’m a sucker for interactive cards…. This one is a doozy!!

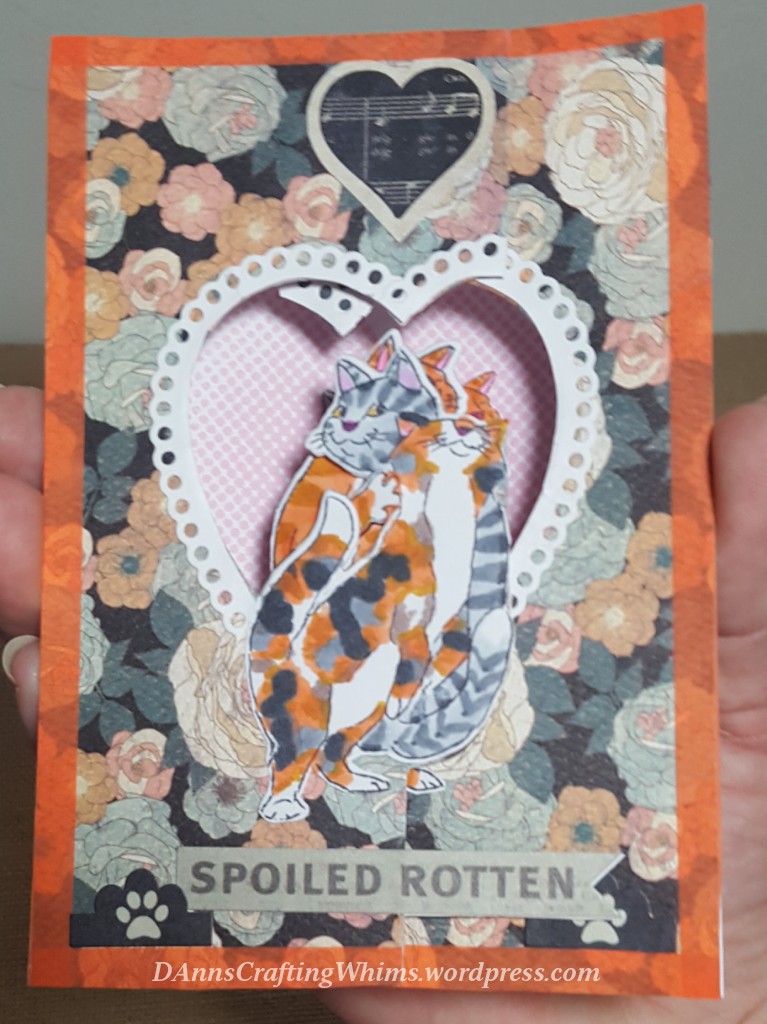
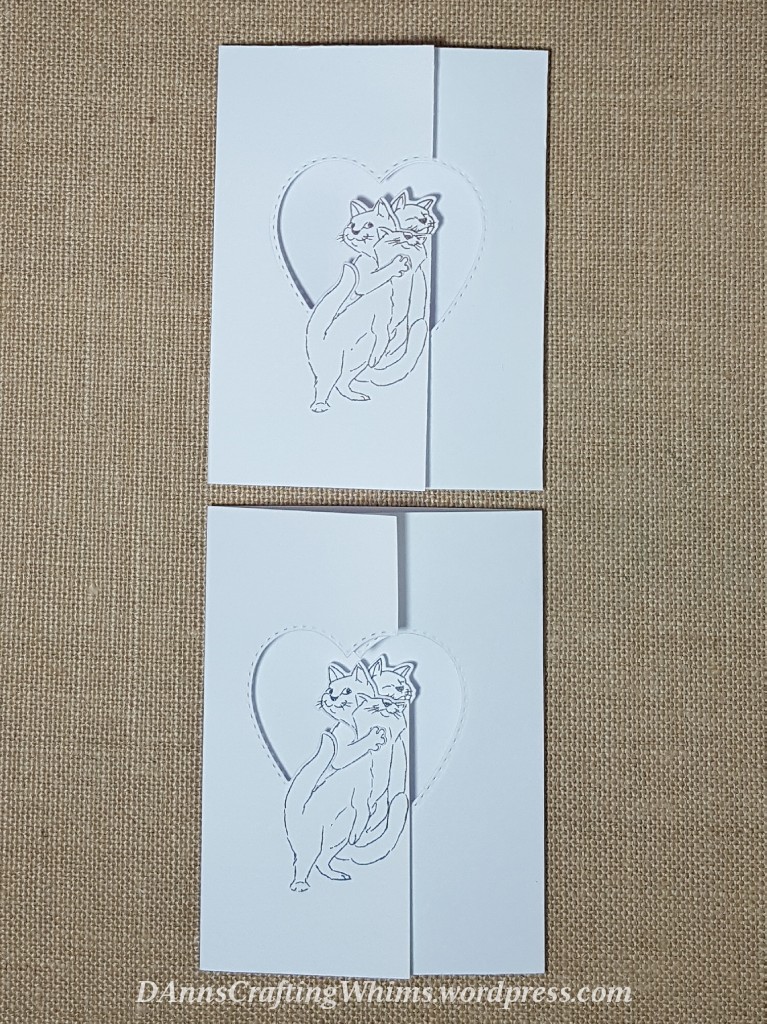
This is a gate-fold card, where the two sides fold together and meet or overlap slightly in the middle. Only on this one, they’re tied together by the interlocking cats. If you push in slightly on the edges, you can slide them apart…

See… the orange tiger kitty is sliding away from the group.

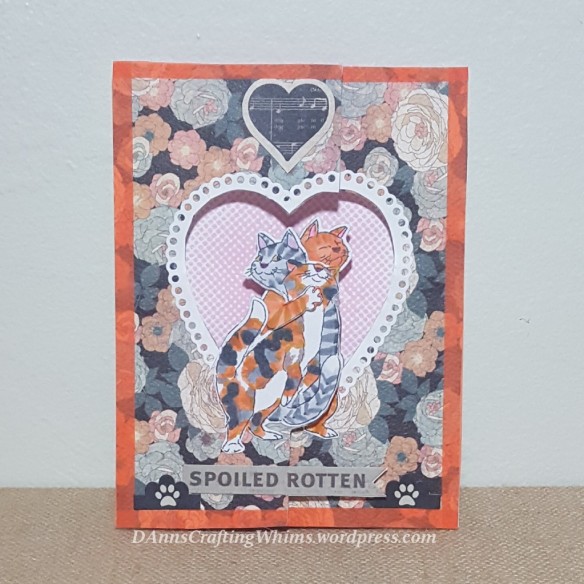
Since the current Art Impressions challenge #245 is Washi Tape, I framed the outside with washi tape and lined the inside with a couple of layers of it, too. For those of you who don’t know what washi tape is a thin decorative adhesive tape; much thinner than masking tape… You can see the underlying patterned paper on the front of the card under the orange, and the row of hearts from the washi tape under the pink washi tape on the inside:

For the inside, I fussy cut the cuddly group and put them together exactly behind the ones in the opening so they’re still hugging on the inside when it’s opened and it says: “Does somebody need a cuddle?” Awww!

There was one part of the directions for this set that wasn’t quite clear. I’m going to jot down some tips and pointers both for my pea-sized brain to refer back to as I’m likely to forget next time I put one of these together, and FYI, too.

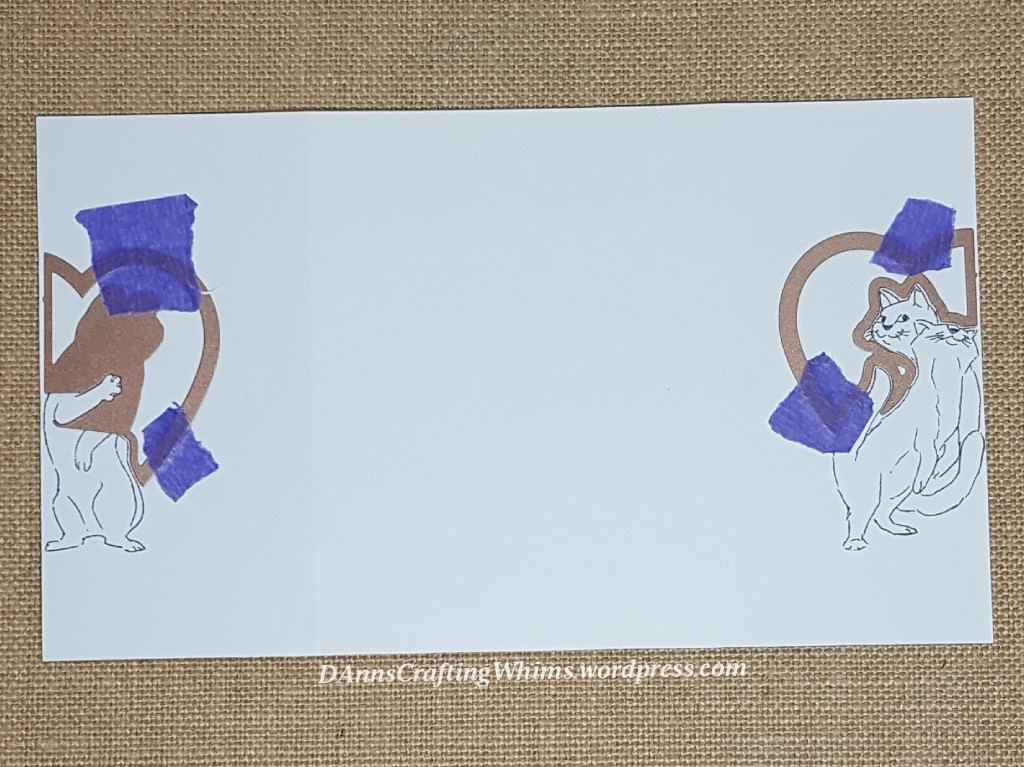
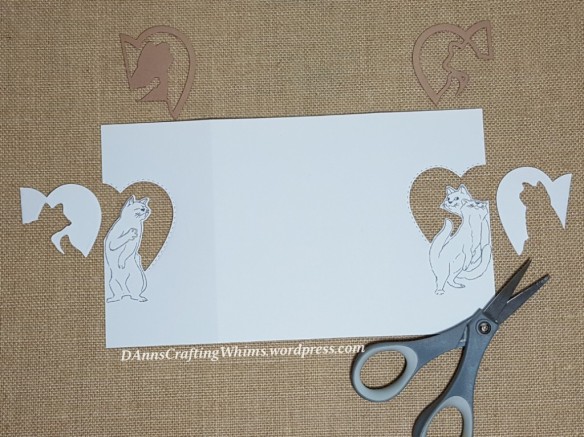
Tip #1 You want the stamp to hit the edges of the paper. I used a MISTI and put the paper in the corner to stamp it, which means there was a tiny space between the edge of the stamp and the edge of the paper, so it didn’t cut out completely. (also: Don’t ink up the corners in the stamps below the cats… they’re just there to help you place the cats properly… place the corner of the stamp on the corresponding corner of your card.

No big deal… it’s just 4 tiny snips with a scissors, but you COULD avoid it. Just sayin’.

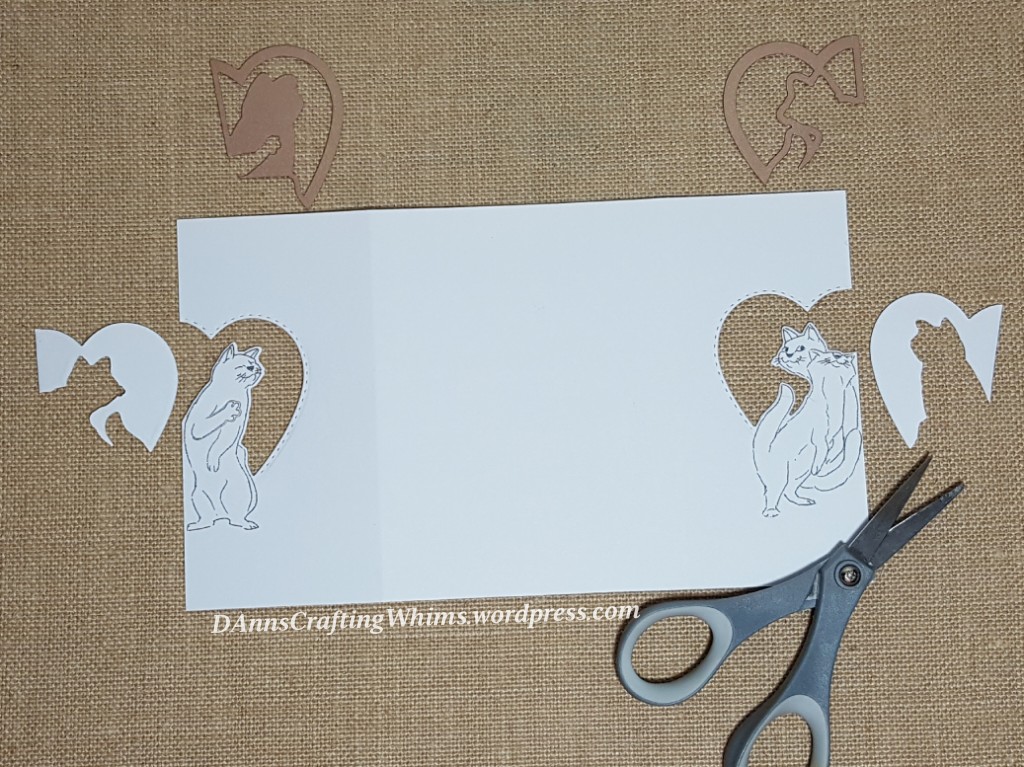
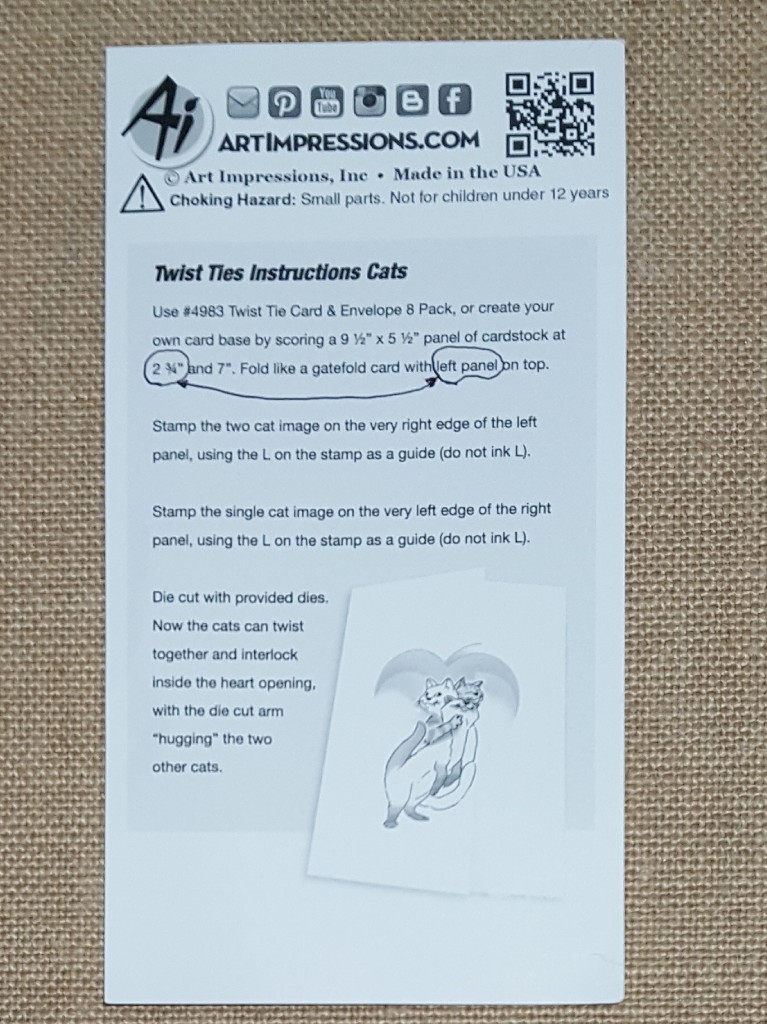
The instructions say to ‘score a 9 1/2″ x 5 1/2″ panel of cardstock at 2 3/4″ and 7:”. Fold like a gatefold card with the left panel on top.’ Well, perhaps you’re smarter than I am, but I wasn’t sure which is the left panel or if it made a difference, so I did it both ways:

As you can see, the longer panel (2 3/4″) puts the finished product in the center of the card. (not to say that an off-center card isn’t cool, too):

Tip #2:  I clearly marked on my package that the wider 2 3/4″ panel is the left panel to TRY to help me remember next time. (We’ll see if it works! lol!) 

Tip #3: don’t crease your scoring until you have the cats stamped and cut out… that gives you a little wiggle room to adjust the folds, if needed.

Tip #4: you can cut off a bit more of the bottom edge if you want some of the foot from the cat in the back showing:

Since the cute stitched edging didn’t show up on my patterned paper, I decided to outline it with a lace heart. None of the heart dies I had on hand were the exact shape of this heart opening, but the Spellbinders Lace Hearts can be cut down and made to fit with a little finagling.

Supplies used:

  • Art Impressions Cat Twist Ties stamps and dies
  • Spellbinders Lace Hearts dies
  • Altenew Halftone Hearts stamps
  • Tsukineko Memento dye inks: Tuxedo Black, Rich Cocoa, Angel Pink, Rose Bud
  • Core’dinations white cardstock
  • Authentique Devoted pad: “Frisky” & “Affection” papers & Devoted Details stickers
  • Copic Markers: C1,3,5,7; E71; YR02, 24
  • Recollections Washi Tapes… various
  • Scotch tape runner
  • Aleene’s Original Tacky Glue

I am playing along with the following challenges, click on any one of them for more information on how you can join the fun:

Next, I hope to finally finish a post I’m working on with some jewelry inspiration for you. You know me… no promises on when I’ll actually finish it, so just stay tuned! : )

Crafty hugs,

~D.Ann

.

p.s. any ads on this page are placed by WordPress and are not endorsed by me.


Nosy Kitty Goes Nuts Over Secret Acorn! Fun Gift Card Holder

I had so much fun with this next card!!! It’d fit the Coffee Lovers Hop, but right now we’re doing the CAT Lovers Hop!

I just adore the look on the face of this Nosy Kitty stamp by Stampendous! What is he staring so intently at inside that acorn? See how his eyes glisten?!! He’s going nuts waiting  to tear into it, for sure! I love that fab Small Die of the Month Acorn by Spellbinders! It was serendipitous to find the acorn shaped gift cards at Starbucks… the perfect match! I had already snipped off the word Fall even though I ended up putting fall leaves around it. I had done a different background, but didn’t like it, so wanted to cover it up. lol!.

So, I set about making an acorn window/pocket to hold the gift card. My original thought was to make it see-through to the cute pair inside, but I have to admit, by this point I was like a kitten after gorging on milk… barely holding my eyes open. (insert cute viral video of kitten falling asleep here. Lol! >^.^<) I thought the better of chasing my tail all night and kept it fairly simple. Maybe some other time!

On the inside I stamped this cute couple of chipmunks inside the acorn (it must be HUGE). I didn’t want to color them with Copics as they’d bleed through to the back, and they looked too plain uncolored, so I got out my Polychromos and colored them up. This will make a great Thank You card for a couple of coffee loving friends!

To finish off the project, I stamped the cat and a chipmunk with an acorn on the envelope:

Supplies:

  • Spellbinders Small Die of the Month – October 2018
  • Stampendous Nosy Cat stamp
  • Neat & Tangled My Favorite Nut and Purrrfect stamp sets (inside & envelope)
  • Core’dinations white and kraft cardstock
  • Colorbok Shiny Rust Foil Cardstock
  • Tsukineko Memento dye ink: Rich Cocoa & Tuxedo Black
  • Copic markers (cat): C7; E55, 71; G24; R20, 22; Y32; YG17, 61; YR02, 24, 31
  • Faber-Castell Polychromos pencils (inside of card) Brown Ochre, Burnt Carmine, Burnt Sienna, Cadmium Yellow, Dark Cadmium Yellow, Deep Red, Green Gold, May Green, Olive Green, Orange Glaze, Pink Madder Lake, Raw Umber, Van Dyck Brown
  • Pebbles, Inc. Pearlescent Chalks Jewel Tones
  • Spectrum Noir Sparkle pen – clear
  • Ranger Inkssentials Glossy Accents
  • Nicole Maple Leaves
  • The Paper Studio paw gemstones
  • Aleene’s Original Tacky Glue
  • Misc: Starbucks gift card, ribbon, envelope

I’m playing along with the following challenges – click on any one of them for more information on how you can join the fun:


*****      Giveaway now closed      *****

Today’s giveaway is really 4! I received a free sub to Catster Magazine and have 4 individual copies to give away! Most are missing a small square where the address label was and one has some pages that were folded by accident, but they’re still a fun read. Here are the magazine covers:

  1. January/February 2018 issue:

2. March/April 2018 issue:

3.  May/June 2018 issue:

4.  September/October 2018 issue:

What do you have to do to be eligible to win ONE of these magazines? If you’re interested, just leave me a comment using the word “Catster” somewhere in your comment. If you have a preference for a particular issue, please let me know. Sorry, international peeps, this one needs to be US residents only as they’re a bit heavy.

Bonus entry option #1: Be a follower of my blog and leave me another comment.

For a second bonus entry, follow me on Instagram (@d.ann.c), like and comment on the post featuring this project. (It doesn’t have to be a long comment, just a heart will do.) Come back here and leave a comment letting me know that you did it and your Instagram name.

Bonus entry option #3 (for a total of 4 possible entries): Follow me on Pinterest(@dannscraftingand re-pin any one of my cards or projects that you like. (If you don’t like them, you don’t have to pin any. lol!) Come back here and leave a comment letting me know your Pinterest name.

You will have until Midnight, Eastern Standard Time, October 28, 2018 to get your comments in. Sometime after noon Eastern Standard Time on Monday, October 29, I will publish a post listing all winners from giveaways on my blog from this hop (chosen using Random.org). Winners will have 48 hours to claim their prizes so, if you’re not subscribed, be sure to check back later that afternoon for that post!!


~D.Ann

.

p.s. any ads on this page are placed by WordPress and are not endorsed by me.

Hugs Card with Felt Bear

Hello and thanks for stopping by!

I needed a card for a family that is dear to my heart and worth their weight in gold. In fact, the last time we were at a gold mine, I got them a little gold to say how much I value their friendship. So I put together this card and gift set for them:

The ‘hu’ and ‘gs’ of the word hugs interlock to close the card. When you open it, there’s a bear inside and it says Big Hearts Deserve Big Hugs! Because I keep them close to my heart, the bear has the names of the family on his heart. Awww. With fall coming, as that felt bear gets ready to hibernate, he’s taking his treasures with him! I hand cut a little tail for the bear’s backside. Tip: I keep a bag for all felt scraps and thread pieces from art and sewing projects… they make great stuffing for small felt critters!

I love this pretty paper from DCWV! It’s foiled and most sheets go well with each other. Fall in Florida us when the flowers come back and these are in muted fall colors:

I fussy cut one of the butterflies and glued it to the h. here you can see the card opening

… and closed again. Such a clever die!

Supplies:

  • Concord & 9th Hugs Card die
  • Concord & 9th Cuddles & Hugs stamp set
  • Essentials by Ellen All Inside stamp & die and Bear Hugs die
  • Fiskars Friends Forever quotes stamp set
  • Spellbinders Gold Labels 4
  • DCWV The Butterfly Garden stack cardstock
  • Hero Arts ombre ink pads: ombre dolphin ; pink to red;
  • Tsukineko Memento Rich Coocoa dye ink
  • Copic Markers C1 E 13, 33, 71; R20
  • Pebbles inc., Classic Chalks Earthtone Shades
  • Aleene’s Original Tacky Glue
  • The Kunin Group Rainbow Classicfelt ecofi: Sandstone, Walnut Brown (and felt  and thread scraps to fill the bear)
  • Papertrey Ink felt: Raspberry Fizz
  • Artiste metallic floss – gold

I’m playing along with the following challenges – click on any one of them for more information on how you can join the fun:

I always appreciate your kind comments! Thanks for taking the time to leave them!! Big, squishy bear hugs to you all!

~D.Ann

.

p.s. any ads on this page are placed by WordPress and are not endorsed by me.

Hero Arts – We Gato Feel the Mewsic! Card

Hello and welcome to the party today! These two Latin cats (Gatos in Spanish) are ‘feline’ might fine as they play their MEWsic! I wonder if they’re playing the Mexican CAT Dance?!

Here’ a short video to show the wobble feature in action:

This is the first time I successfully got a ‘furry’ look by using Copic Various Ink and a dish towel. Seems my fuzzy rag was the wrong texture and was leaching ALL the color.


To give the flowers some depth, I pinched the side petals of the middle flowers upward.

I put YELLOW drops in the centers and was surprised the next day to see they had leeches some of the from the inks on the blanket pattern underneath (first pic).


Well, it looked kind of nifty, so I took some Copic markers and made them match the blanket colors.

Materials used:

  • Hero Arts My Monthly Hero April 2018 (MH0418C) stamps and dies
  • Hero Arts Cinco de Meow stamp set
  • Hero Arts Blanket Pattern Bold Prints background stamp
  • Hero Arts My Monthly Hero ink cubes: Fiesta Red, Fiesta Yellow, Fiesta Teal
  • Tsukineko Memento dye ink: Tuxedo Black
  • Copic Markers
    • Orange cat: G02, 05; R20; RV17; Y17, 38; YR02, 04, 07
    • Gray cat: C1,3,5; R20; RV17
    • guitar: E23, 33, 55, 57
  • Copic Various ink – colorless blender & old towel
  • Core’dinations cardstock: white, yellow and green
  • Tonic Studios Nuvo Crystal Drops: Gloss Dandelion Yellow
    • Copic Markers: R29, 24; YR07; G19, 29; BG18; B29
  • Scotch permanent adhesive dots
  • Scrapbook Adhesives by 3L 3D Foam Squares
  • Simply Defined “Stay Put” glue
  • Action Wobble Springs — they have the cutest packaging:

I’m playing along with the following challenges – click on any one of them for more information on how you can join the fun:

Thanks for shakin’ it up with us today!

~D.Ann

.

p.s. any ads on this page are placed by WordPress and are not endorsed by me.


Giant Raspberry for 2017 – the Year in Review

As 2017 draws to a close, I feel like giving it a giant raspberry…

LOL! (for my foreign readers, a raspberry can also mean and expression of disapproval by sticking out one’s tongue and blowing out air to make a vibrating sound) Last week was the week of giant berries:

Now, ‘them’s the berries!!”

Just look at those berries compared to the normal sized berries in the middle! Amazing! And they were sweet, too!! A foretaste of paradise!

So, yeah, as most of you know health-wise, this was a bad year – not to mention the hurricane. It culminated with a severe migraine that started November 30 and has yet to go away over 4 weeks later. Ugh! The longest I’ve ever had one was my very first one which lasted 6 weeks. I’m hoping that I’m NOT going for a record! Needless to say, I got much less crafting done this year. I’ve been putting this post together in stages for several days now in those brief moments of semi-lucidity. ; )

Despite everything that was going on, I was able to make 86 posts this year. This blog had 2612 visitors (including you 63 faithful followers) from 57 countries who left 832 kind comments. Thank you all for your support!!

I was thrilled to have the honor of being a guest designer for the CropStop blog a couple of times this year:


I was also delighted to be invited to be a guest designer for the MarkerPOP! challenge blog with this card:

It was exciting to see few of my cards received special recognition:


for this card:

for this card on Instagram:

and 

for this fun card:

These were the most visited blog posts this past year (in order and not necessarily posted this year – interesting!) – if you missed any of them, just click on the picture to be taken to the original post:


These were this year’s posts that elicited the most comments, in order (click on any picture if you want to go see the original post for more details):


Here are the top nine from Instagram (the ones that got the most ‘likes):


Thanks to the 210 followers and others who left over 3000 ‘likes’ on my 103 Instagram posts!

Let’s hope that 2018 is a better year for us all! I hope to catch up on several things that I didn’t get to post this year, including a DIY photo light box and some beaded tie chains. Plus, I have some craft storage ideas, including a DIY jewelry case. I’m hoping my health will let me be a little more regular in posting and in crafting wherever the whim takes me! Thanks for accompanying me on this journey!! See you next year.

~D.Ann

.

p.s. any ads on this page are placed by WordPress and are not endorsed by me.


Double Sided, Multi-Colored, Multi-Window Uchi’s Design Animated Cat Card

Hello, hello! Here we are on the penultimate day of the Cat Lovers Hop.

As the saying goes: ‘Time sky raisins when you’re having fun!’ What?! Since there are so many new hoppers, I HAVE to re-share with you my favorite cat meme and you’ll understand:

Three years in a row and it still makes me laugh!

I have my last interactive card to show you today and it’s a doozy… In fact, it can only REALLY be appreciated in a video. so here’s one from Instagram. (Roll your mouse over the picture and click the white arrow to play it):


It’s so mesmerizing, I could play with it for hours!

I just LOVE animated cards and am tickled that my first attempt turned out as well as it did! I have a bonus tutorial for you. I used Uchi’s Animation Die Cut to make that flower! So another way to stretch your dies, should you have it (or be able to talk some sweet friend or relative into getting it for you!). So you’re going to turn this grid into that flower:

First you have to trim down the grid leaving the same width at the top and bottom. You don’t want this too thick because that’s how much your flower will stick up off your card.

Next you gently fold the grid around a pen and glue the ends together. Use the barrel of the pen to smooth out the curves of the ‘petals.’

Then you run a bead of glue along the bottom seam and start rolling it over on itself, molding it into a circle.

Here’s what it looks like all rolled up. (Hmph… I see I didn’t worry too much about curving the petals since I was just demo-ing for you… they are rather pointy. Oh well…)

Then you gently separate the petals and pull them out to the sides and put a brad in the center and tah-dah… a cute little flower!

You can also see from these close-ups, the advantage of using the Animation Die versus just buying the sheets… You can color it to match your stamp… even using multiple colors!

I waited to color the grids to match until AFTER I could set the stamped pull tab in the middle of the card and see where the colors needed to be on the grids, but BEFORE I closed it up… that way I could do it over scratch paper and not worry about getting any ink on my stamped slider.

Note: I tried putting just a solid color (black or other) as a grid over the colored stamped images and they also worked as animated images. It’s just cooler when the colors match!

Did you notice that the same pull tab animates both sides (simultaneously)! That was not without some engineering obstacles… for example the first time I stamped my images – after I had already figured out and made the front and back — oops! I did them in reverse and had to re-stamp them (which was much easier than lining up my grids again!).

By the way – don’t let this semi-complicated card intimidate you. You can make these very simple with just one animated image and they’re just as entertaining!

Her are the still pictures of the card. Here’s the front. ( I added that cute kitty sticker going for the dragonfly – doesn’t it look like he’s just about to pounce!):

And here’s the back. I like the optical illusion of the background paper mixed with these animations! Wish I knew the manufacturer, I’d get more!

Materials used:

  • Uchi’s Design Animation Stamp sets: Loving Cat; Growing Garden; Butterflies
  • Uchi’s Design Animation Grid Die (Thank you , Uchi’s for this prize when you released it on Instagram!!)
  • Spellbinders dies: Classic Circles, Gold Circles One and Exquisite Circles
  • Tsukineko Memento dye ink: Tuxedo Black
  • Simon Says Stamp Hybrid Ink – Watermelon
  • Tombow Dual Brush Pens: 025, 195, 373, 856, 933
  • Pebbles, Inc. Pearlescent Chalks Jewel Tones
  • Core’dinations cardstock: Black, Red & White & 110# white
  • Basic Grey Hey Girl cardstock
  • Craft Smith Flutterbloom (optical illusion paper)
  • Therm-O-Web I-Craft Easy Tear Tape double sided adhesive 1/2″ & 1/4″
  • Tombow Xtreme permanent adhesive
  • Scrapbook Adhesives by 3L Crafty Foam Tape
  • Aleene’s Original Tacky glue
  • Avery Ultra Tabs
  • Misc. Brad

I am playing along in the following hops and challenges – click on any one of them for more information on how you can join in on the fun!

How about another delicate hint for my Blog Candy Giveaway games from THIS post. Don’t forget: some words may be in there backwards! Although I can’t cater to your every whim, have no fear, you will still get entries for the Bonus questions whether or not you get the answers to #1 and #2 correct. At least you’re now two words closer! Have fun!

I’m so glad to have had all of you visit and have thoroughly enjoyed reading your delightful comments! Thank you for taking the time!!

~D.Ann

.

p.s. any ads on this page are placed by WordPress and are not endorsed by me.