Darling House Mouse Cards

Hello and welcome! Today I have a set of darling House Mouse cards to share with you.

If you follow me on Instagram, you know that I’ve been trying to keep up with #TheDailyMarker30Day coloring challenge this month. This time around I’ve tried to stretch my coloring skills, and ventured into doing some skies with Copic markers.

Previously, after finishing coloring the main image in Copics, I’ve used chalks for the sky because I would get streaks and unevenness trying to do a sky with Copic markers. I think I’m finally getting the hang of it! On this first card I was also pleased to get a bit of reflection of the walnut in the water, with a natural ripple look, too:

Love the sheen of these DCWV Shimmer Stack papers!! For the inside, I dry embossed the dye (you’ll see it better in the next cards) and used the cutout center as a decorative element:

On the second card, I added some rain to the sky. Here in Florida, it can be both rainy and sunny with a blue sky while raining, rain on one side of the street, but not the other, etc., so I didn’t feel like I needed clouds. I didn’t have a good terracotta color in my Copic collection, but I found that RV 34 and R22 mix together nicely for a close match.

Since part of the die impression reminds me of suns, I ran over the raised ‘suns’ with some yellow chalk and added this little guy celebrating, with my own sentiment:

For the final card, I decided to switch the ice cream color from pink to strawberry-flavored red to match the cardstock. The House Mouse stamps have names for most all of their critters. The bunnies are Hop-it and Itty Bit. I love that little Itty Bit fell asleep in a sugar coma before he got his face and paws cleaned off! : ) I also like that the frame die kind of reminds me of a waffle cone pattern! Since my hands were actually steady today, I took a chance on writing my own sentiment:

Here’s the inside:


Supplies used:

  • First card (Maxwell floating in a walnut)
    • Stampendous House Mouse Pop Stamp set HM01A: POPHM01-09
    • Tonic Studios Deco Oval Trellis die set
    • DCWV The Shimmer Stack cardstock
    • Recollections white cardstock 65# and 110#
    • Tsukineko Memento Rich Cocoa dye ink
    • Copic Markers: B02, 21; BG90; C3; E00, 02, 31, 33, 37, 51; W1; Y35; YG61, 63; YR02, 04
    • Tonic Studios Nuvo Crystal Drops: Gloss Ripened Pumpkin
    • Prima Marketing Planner Glue Pen
    • Simply Defined adhesive runner and ‘Stay Put’ adhesive glue
  • Second card (sitting in a flower pot in the rain)
    • Stampendous House Mouse Pop Stamp set HM01A: POPHM01-02 & 07
    • Inside: Stampendous House Mouse Pop Stamp set HM01A: POPHM01-03
    • Tonic Studios Deco Oval Trellis die set
    • DCWV The Shimmer Stack cardstock
    • Recollections white cardstock 65# and 110#
    • Tsukineko Memento Gray Flannel & Tuxedo Black dye inks
    • Copic Markers: B02, 21; BG90; C1, 3; E00, 02, 51; G24, 82; R22; RV24; YG61, 63; Y35; YR02, 04
    • Pebbles, Inc. Pearlescent Chalks – Jewel Tones
    • Sakura MicroPerm 01 Ultrafine pen
    • Tonic Studios Nuvo Crystal Drops: Gloss Red Berry
    • Prima Marketing Planner Glue Pen
    • Simply Defined adhesive runner and ‘Stay Put’ adhesive glue
  • Third card (ice cream bunnies)
    • Stampendous House Mouse Ice Cream Lick
    • Tonic Studios Deco Oval Trellis die set
    • DCWV The Shimmer Stack cardstock
    • Recollections white cardstock 65# and 110#
    • Tsukineko Memento Gray Flannel & Tuxedo Black dye inks
    • Copic Markers: B21; C3; E02, 31, 33, 51; G24, 82; R24; RV02; YG17 61, 63
    • Pebbles, Inc. Pearlescent Chalks – Jewel Tones
    • Sakura MicroPerm 01 Ultrafine pen
    • Prima Marketing Planner Glue Pen
    • Simply Defined adhesive runner and ‘Stay Put’ adhesive glue

I’m entering this card in the following fun challenges… click on any of them for more information on how you can play along:

20190205_SSSm

I’m glad you stopped by! Hope to see you again soon!!

~D.Ann

.

p.s. any ads on this page are placed by WordPress and are not endorsed by me.


My Monthly Hero Paraguayan Dancer Card

¡Hola! Hello! Mba’éichapa! (–that’s “hello” in Guarani – one of the two national languages of Paraguay.) Welcome to a post with an international flavor today! I chose to turn the darling dancing mouse in the My Monthly Hero April 2018 set into a traditional Paraguayan folk dancer doing the famous bottle dance:

When I lived in Paraguay, doing a missionary type work, I would often see women balancing amazing loads on their heads as they walk through the streets… laundry, a basket full of delicious chipas (a cheese bread made with cassava/manioc flour, shaped like a bagel) and more. These well-balanced women really know how to use their heads! In the bottle dance a girl or woman will start by balancing a bottle on her head while dancing. More and more will be added by her partners, one at a time, reaching up to 10 or more! After each, she continues to dance. Impressive!! Here is part of a page from my scrapbook, using a postcard picture:

I just drew a couple of these bottles on cardstock, fussy cut them and covered them with Texture Gems for my little mouse dancer. The texture gems added a little sparkle as centers to the flowers in the frame and sentiment, too.


I love that the leaves on flowers in the frame with this kit can be lifted up… just a little, or into a daffodil shape. I gave my mouse and bottles a little depth by cutting them out in black cardstock and having it peek out just a bit.

Materials Used:

  • Hero Arts My Monthly Hero April 2018 (MH 0418C) stamps and dies (note: bottles were hand drawn)
  • Hero Arts My Monthly Hero Fiesta Red ink
  • Copic Markers: C1,3; Gr05;R20, 22, 24, 29; Y08
  • Faber Castell Texture Gems: Silver
  • Core’dinations cardstock: White, Red, Black
  • Tsukineko Memento dye ink: Tuxedo Black
  • Simply Defined “Stay Put” glue

I’m entering this card in the following fun challenges… click on any of them for more information on how you can play along:

20190206_ABNHero

20190205_SSSm

Thanks for traveling with me today!

~D.Ann

.

p.s. any ads on this page are placed by WordPress and are not endorsed by me.


Set of Humorous Art Impressions ICU Step Cards

Greetings, crafty peeps! Unfortunately, it’s that time of the year when folks are getting sick and ending up in the hospital. I started this set a while back and kept needing to send off a card, so I couldn’t get the complete finished set in a picture. Here are most of them… almost finished… right before I sent off the second one:

They just make me smile!! Hope they do the same for the recipients!

First, I colored the couples up, wanting to be able to choose from a rainbow of ladies with different colored hair. Next time I want to add in some olive and dark skinned ladies, too.

Then I added some glossy accents to the eyes, lips & earrings, and to the purse and shoes for a patent leather look.

Next, I matched each lady up with a matching cardstock for the step card base and found some decorative paper to match for the background. Then I sewed the ‘curtain’ to a piece of cardstock and attached everything to the card, added the heartbeat cutout and sentiment and the front of the card was done:

Here’s a side view:

On the back, where the heart is (on this particular step card die), I added the sentiment: “Hope you’ll soon be fully re-covered!” and one of the left-over hearts from the heartbeat die cut. The envelope says: “Sending a little laughter… it’s the BEST medicine!”

So here are the rest of them – just variations on a theme:

Materials used:

  • Art Impressions Get Well stamp set
  • Sizzix Card, Hearts Step-Up die
  • SugarPea Designs Heart Beat SugarCut die
  • My Sentiments Exactly Back of Card stamp set
  • Tsukineko Versamark Ink
  • Inkadinkado embossing powder – black
  • Memento dye ink – Tuxedo Black
  • Copic Markers: B05, 21,29; BG13,15; C3; E000,00,02; R24,29
  • Ranger Inkssentials Glossy Accents
  • Kuretake Zig Wink of Stella clear
  • Scrapbook Adhesives by 3L tape runner
  • Simply Defined ‘Stay Put’ Glue
  • Misc. Seafoam gauze material (Hobby Lobby), thread
    • Red card:
      • Core’dinations cardstock – red, white
      • Basic Grey Blush-Admire paper
      • Copic Markers:  B05, 21; BG13,15; C1, 3; E02, 51; R24, 29
    • Yellow card:
      • Core’dinations cardstock – red, white, yellow
      • K & Company Contemporary Papers
      • Copic Markers:  BG13,15; C1, 3; E00, 02, 23, 33, 51; R35; Y06, 08, 13
    • Green card:
      • Core’dinations cardstock – green, red, white
      • Frances Meyer Diva Stripes paper
      • Copic Markers: B02; BG13,15; C1, 3; E02, 51; G02, 05, 09; R29
    • Blue card:
      • Core’dinations cardstock – blue, red, white
      • Basic Grey Blush-Admire paper
      • Copic Markers: B02, 05, 24; BG13,15; C1, 3; E02, 51; R29
    • Purple card:
      • Spellbinders Conversation Bubble 1 die
      • Core’dinations cardstock – lilac, pale green, red, white
      • Recollections Blue Ditsy Floral paper
      • Copic Markers: B21; BG13,15; C1, 3; E00, 02, 71; R29
      • Sakura Micron pen 05 black
    • Pink card:
      • Spellbinders Conversation Bubble 1 die
      • Core’dinations cardstock – pale green, pink, red, white
      • DCWV Butterfly stack
      • Copic Markers: BG13,15; C3, 5, 7; E02, 11; RV02, 04, 17; V15, 17, 25
    • Orange card:
      • Core’dinations cardstock – orange, red, white
      • Frances Meyer Diva Stripes paper
      • Copic Markers:  BG13,15; C1, 3, 5, 7; E00, 02, 51; R29; YR 02, 04, 07

I’m entering this card in the following fun challenges… click on any of them for more information on how you can play along:

Thanks for stopping by! I hope YOU stay healthy and no-one else ends up in the ICU!!

~D.Ann

.

p.s. any ads on this page are placed by WordPress and are not endorsed by me.


Wishing You Oceans of Joy

Hello, sweet peeps! I know this has been a nearly unprecedented streak of posting, but I’m almost caught up with the backlog, and then we’ll get back to my ‘whenever the whim hits’ pattern. : )

Today I have a fun card — it’d be great for a BFF’s engagement party, don’t you think?!

All the stamps and dies I used to make this were new to me and I love how they go together! Remember back when I played with Pebeo Fantasy paints for the first time back in THIS post? (good grief, it’s been almost a year! I told you I was backlogged!! At that time I also tried some on paper thinking they’d be cool for a mermaid’s tail. I was right! This was the result:

I outlined it first with Pebeo Vitrail Glitter Medium and let it dry, then filled it with the Pebeo Prisme paints which hold their own and don’t mix into brown as green and purple normally would. As they dry, they for these fabulous cell ‘scales’!

Embossing the lines of the clam shell and puffing up the pillow with a stylus, like the Heartfelt Creations Flower Shaping Essentials tool, helps give it dimension!:

Here’s a close-up of that cute little seahorse:

Now that I know the Pebeo Prisme paints work so well, I need to make a whole set of mermaid cards!

Materials used:

  • Make it Crafty: Cordelia the Mermaid and Clam Shell
  • Create a Smile: Under the Sea
  • Hero Arts Color Layering Seahorse stamp set
  • Simply Defined Time & Tides Coral Reef die
  • Pebeo Prisme Pearl Violine and Emerald & Vitrail Glitter Medium.
  • Copic Markers
    • shell: R20,22; Y000, 13; V12
    • hair: E13; YR02, 21, 24, Y28
    • eyes: G02; BG13; V06
    • skin: E00, 02, 11
    • E02, 04; y13, R22
  • Faber-Castell Texture Gems, Gold, Pearl
  • Kuretake Zig Wink of Stella clear
  • Tonic Studios Nuvo Crystal Drops: Buttermilk, Crushed Grape, Mornig Dew, Raspberry Pink, Ripened Pumpkin, Sugared Almond
  • Tsukineko Memento dye inks:Tuxedo Black, Sweet Plum
  • Tsukineko Brilliance Pigment inks: Pearlescent Poppy & Rocket Red Gold
  • Ranger Tim Holtz Distress Oxides: Abandoned Coral, Fired Brick, Fossilized Amber, Peacock Feathers, Peeled PaintSeedless Preserves, Salty Ocean, Spiced Marmalade, Twisted Citron, and Wild Honey
  • Core’dinations Cardstock: Blue, Teal, Light Blue, Pink, White
  • Misc adhesives, shells and pearls

I am playing along with the following challenges – click on any one for more information on how you can join the fun!

~D.Ann

.

p.s. any ads on this page are placed by WordPress and are not endorsed by me.

Hello My Favorite Nuts Acorn Shaker with Gift Card

Hello, again! I’m glad you’ve returned! Today’s card is a shaker with a surprise:

Those of you who follow me, may recall THIS card with a similar concealed surprise. I just love that the Spellbinders Die-of-the-Month acorn can be turned into a gift card holder for these fun acorn-shaped gift cards from that coffee shop that ends in BUCK$!

And the Queen & Company Happy Harvest Fall Kit has those fab acorn shakers to match. This time the shaker is filled with fabulous mini ‘gems.’ Observation: The gorgeous glitter paper in that kit is made so well that the glitter won’t rub off, but that also means it’s not really the best for intricate dies, like the Hello Fall insert of this acorn die. It simply doesn’t want to cut clear through. I recommend using it for non-intricate cutting. The leaf also gets added dimension when you score the veins. The acorns get some realistic color with a dauber and some Distress inks.

What else is behind that acorn?….

This darling family! I love that the two squirrels/chipmunks in the acorn are hugging, with coffee in hand… something that has led to many a spill in this family! And the mugs have kitty paw prints on them and a stuffed kitty is lying on the floor… another signature of our family. The sentiment: ‘You are my favorite nuts’ – ever so apropos! By cutting them out of separate cardstock, I was able to color them with Copics and not have them bleed through to the back of the card. It also allowed me to fussy cut around the arms and put them through the cup handles.

By the way… didja notice that acorns, just like humans, come in all varieties?! : )

Materials used:

  • Spellbinders Small Die of the Month – October 2018
  • Queen & Co.  Happy Harvest Fall Kit (dies, foam, clear plastic, paper, glitter paper and beads)
  • Neat & Tangled My Favorite Nut stamps & dies; Puppy’s Favorite Things stamps
  • Core’dinations cardstock: white, brown, kraft, yellow
  • Recollections card base
  • Tsukineko Memento Desert Sand dye ink
  • Ranger Tim Holtz Distress Inks: Spiced Marmalade, Rusty Hinge, Barn Door, Vintage Photo and Walnut Stain
  • Copic Markers: E13, 23, 25, 29, 31, 55, 71;Y38; YR02, 04, 07, 24; W1
  • Simply Defined Permanent adhesive runner & Stay-Put adhesive glue
  • Misc. ribbon and Starbucks gift card

I am playing along with the following hops and challenges. Be sure to click on them for more information on how you can play along and enter for prizes:

I’m so glad you stopped by! I enjoy reading your encouraging messages and greatly appreciate them!

~D.Ann

.

p.s. any ads on this page are placed by WordPress and are not endorsed by me.

Art Impressions Cat Twist Ties Cuddle Cats Group Hug Gate Fold Card and Construction Tips

Yes, another cat card! This one was supposed to have made the Cat Lovers Hop, but the company I’d ordered the stamp set from goofed and sent me the wrong set and the correct one didn’t arrive until after the hop was done. (FYI, it wasn’t Art Impressions, this was before they had this set up on their site) I still needed to make up the card I had planned, so here we are. : )

This stamp set is SO us, I just HAD to get it to make first and foremost for the other special folks in my favorite group hug pack! And, you know me… I’m a sucker for interactive cards…. This one is a doozy!!

This is a gate-fold card, where the two sides fold together and meet or overlap slightly in the middle. Only on this one, they’re tied together by the interlocking cats. If you push in slightly on the edges, you can slide them apart…

See… the orange tiger kitty is sliding away from the group.

Since the current Art Impressions challenge #245 is Washi Tape, I framed the outside with washi tape and lined the inside with a couple of layers of it, too. For those of you who don’t know what washi tape is a thin decorative adhesive tape; much thinner than masking tape… You can see the underlying patterned paper on the front of the card under the orange, and the row of hearts from the washi tape under the pink washi tape on the inside:

For the inside, I fussy cut the cuddly group and put them together exactly behind the ones in the opening so they’re still hugging on the inside when it’s opened and it says: “Does somebody need a cuddle?” Awww!

There was one part of the directions for this set that wasn’t quite clear. I’m going to jot down some tips and pointers both for my pea-sized brain to refer back to as I’m likely to forget next time I put one of these together, and FYI, too.

Tip #1 You want the stamp to hit the edges of the paper. I used a MISTI and put the paper in the corner to stamp it, which means there was a tiny space between the edge of the stamp and the edge of the paper, so it didn’t cut out completely. (also: Don’t ink up the corners in the stamps below the cats… they’re just there to help you place the cats properly… place the corner of the stamp on the corresponding corner of your card.

No big deal… it’s just 4 tiny snips with a scissors, but you COULD avoid it. Just sayin’.

The instructions say to ‘score a 9 1/2″ x 5 1/2″ panel of cardstock at 2 3/4″ and 7:”. Fold like a gatefold card with the left panel on top.’ Well, perhaps you’re smarter than I am, but I wasn’t sure which is the left panel or if it made a difference, so I did it both ways:

As you can see, the longer panel (2 3/4″) puts the finished product in the center of the card. (not to say that an off-center card isn’t cool, too):

Tip #2:  I clearly marked on my package that the wider 2 3/4″ panel is the left panel to TRY to help me remember next time. (We’ll see if it works! lol!) 

Tip #3: don’t crease your scoring until you have the cats stamped and cut out… that gives you a little wiggle room to adjust the folds, if needed.

Tip #4: you can cut off a bit more of the bottom edge if you want some of the foot from the cat in the back showing:

Since the cute stitched edging didn’t show up on my patterned paper, I decided to outline it with a lace heart. None of the heart dies I had on hand were the exact shape of this heart opening, but the Spellbinders Lace Hearts can be cut down and made to fit with a little finagling.

Supplies used:

  • Art Impressions Cat Twist Ties stamps and dies
  • Spellbinders Lace Hearts dies
  • Altenew Halftone Hearts stamps
  • Tsukineko Memento dye inks: Tuxedo Black, Rich Cocoa, Angel Pink, Rose Bud
  • Core’dinations white cardstock
  • Authentique Devoted pad: “Frisky” & “Affection” papers & Devoted Details stickers
  • Copic Markers: C1,3,5,7; E71; YR02, 24
  • Recollections Washi Tapes… various
  • Scotch tape runner
  • Aleene’s Original Tacky Glue

I am playing along with the following challenges, click on any one of them for more information on how you can join the fun:

Next, I hope to finally finish a post I’m working on with some jewelry inspiration for you. You know me… no promises on when I’ll actually finish it, so just stay tuned! : )

Crafty hugs,

~D.Ann

.

p.s. any ads on this page are placed by WordPress and are not endorsed by me.


Dreamerland Wondering How You Are Doing Kitty Card

Hello again, sweet kitty loving peeps! (and everyone else, which is probably about 1% of you. lol!)

The Cat Lovers Hop continues and, of course, I have yet another kitty card!

Isn’t she just the sweetest? So, is Kitty wondering how the girl is doing or is she writing to someone wondering how they are doing?

One small detail: To give our gal some depth, after stamping and diecutting, I popped just her head up with a foam dot. The girl got folded at the knees and just her feet and head got foam dots. Also, the first pile of stamped books I fussy cut so they’d appear farther back than the diecut pile with the edge.

Supplies:

  • Dreamerland Crafts: Just a Note to Say & Wondering How You are Doing stamp & die sets
  • Tonic Studios: Ornate Frame dies
  • Recollections 110# ivory cardstock
  • Tsukineko Memento Rich Cocoa & Tuxedo Black dye ink
  • Copic Markers: B21, 24; BG13, 45, 72; BV04; C1, 3; E00, 11, 23, 31, 33, 37, 51, 55, G02, 25; R22, 24, 29, 89; RV17, 19; V04, 06, 12, 15, 17; Y17, 28, 32; YG63, YR04, 07, 31
  • Pebbles, Inc. Pearlescent Chalks Jewel Tones
  • Shuttle Art Gel Pens
  • Ranger Inkssentials Glossy Accents (window panes)
  • Tonic Studios Nuvo Crystal Drops – Copper Penny (window latches)
  • Simply Defined Stay-Put glue
  • Misc. Foam Dots


*****      Giveaway now closed      *****

Lets have another giveaway! Check out this little package (#6) of feline goodies that I have to for one of you:

A cat scarf, pen, color in post cards, kitty tissues, cat eraser, washi tape, sticky notes, a magnetic bookmark, and even a glow-in-the-dark cat necklace! Furbulous fun, eh?!!

What do you have to do to be eligible to win my prize package #6? If you’re interested, just leave me a comment using the word “hairball” somewhere in your comment.

Bonus entry option #1: Be a follower of my blog and leave me another comment.

For a second bonus entry, follow me on Instagram (@d.ann.c), like and comment on the post featuring this project. (It doesn’t have to be a long comment, just a heart will do.) Come back here and leave a comment letting me know that you did it and your Instagram name.

Bonus entry option #3 (for a total of 4 possible entries): Follow me on Pinterest(@dannscraftingand re-pin any one of my cards or projects that you like. (If you don’t like them, you don’t have to pin any. lol!) Come back here and leave a comment letting me know your Pinterest name.

You will have until Midnight, Eastern Standard Time, October 28, 2018 to get your comments in. Sometime after noon Eastern Standard Time on Monday, October 29, I will publish a post listing all winners from giveaways on my blog from this hop (chosen using Random.org). Winners will have 48 hours to claim their prizes so, if you’re not subscribed, be sure to check back later that afternoon for that post!!

!

~D.Ann

.

p.s. any ads on this page are placed by WordPress and are not endorsed by me.


Art Impressions Kitten Vanity PopCard

Popping back in with a darling pop-up card for the Cat Lovers Hop.

The current Art Impressions Challenge is Add Embellishments. My embellishing starts with paper… I chose this weathered wood paper to look like the exterior of a house.

Note to self: don’t tack down the bottom of the background paper on the front of the card  until AFTER cutting the slits for pop-up mechanism… BELIEVE me, it’s better!! : )

On the ‘wall’ I hung some Graphic 45 ‘pictures’ and there are ribbon ‘curtains.’ I love the realistic antics of these stamped kittens whether they’re getting into everything or snoozing away!! A perfect fit for the Simon Says Stamp Wednesday Challenge: Animal Antics and the Lost Coast Designs & Carmen’s Veranda Challenge #63 Cats & Dogs!

There is some twine to make the yarn ball more realistic. For the ribbed ‘wood baseboards’, I took a thin strip of kraft paper and scored along it every 1/8″, then shaved an 1/8″ piece perpendicular to the scoring.

Add a few well placed “meows”, including one for the extra kitty who’s managed to get in behind the vanity, climb up the back, and is mischievously about to bat at the roses!

Embellishing also means bling… foil for the mirror, glossy accents for the vase and eyes and loads of Sparkle Pen to add shine to the purse, fur stole, hat and roses. Oh, and don’t forget to embellish the envelope with a few stamps, too. : )

Here’s a video of the card in action *click in the middle of the picture on the white arrow)

Supplies:

  • Art Impressions: PopCards Kitten Vanity stamps & dies
  • Art Impressions 3D PopCard Template & Window dies
  • Spellbinders Conversation Bubble 1 die
  • DCWV boxed card set
  • Recollections turquoise wood plank paper
  • Recollections kraft & white cardstock
  • Spellbinders Platinum Pack 3 Poster Board gold
  • G45 Raining Cats & Dogs chipboard
  • Tsukineko Tuxedo Black & Desert Sand (env.) dye ink
  • Brutus Monroe Alabaster pigment ink
  • Copic markers: BG13, 72; C3, E25, 31, 55, 71; G24, 82 R02, 20, 22, 24; RV02; W1; Y13; YG 61; YR02, 24
  • Shuttle Art gel pens
  • Spectrum Noir Sparkle pen – clear
  • Ranger Inkssentials Glossy Accents
  • DecoArt foil transfer sheet – silver
  • Deco Art adhesive pen
  • E6000 glue
  • Simply Defined Permanent Plus Adhesive
  • Wyla lace
  • Misc. acetate from packaging & twine

I’m playing along with the following challenges – click on any one of them for more information on how you can join the fun:

20170720ArtImpressions

20180812_SSSw

20181023LostCoast

I always appreciate your kind comments! Thanks for taking the time to leave them!!

~D.Ann

.

p.s. any ads on this page are placed by WordPress and are not endorsed by me.

Ice Cream Solves Everything Kitty Cone Cards and Key Chains with Newton’s Nook Designs

Hello, there! I’m so glad you could stop by as I have some cool summer fun to share with you today! Go grab some ice cream, this is a long one. Just sayin’!  For some reason I couldn’t get my brain to work on saying things succinctly. (Plus there are 4 cards this time.) So I won’t be offended if you just take a quick scroll through the pics. : )

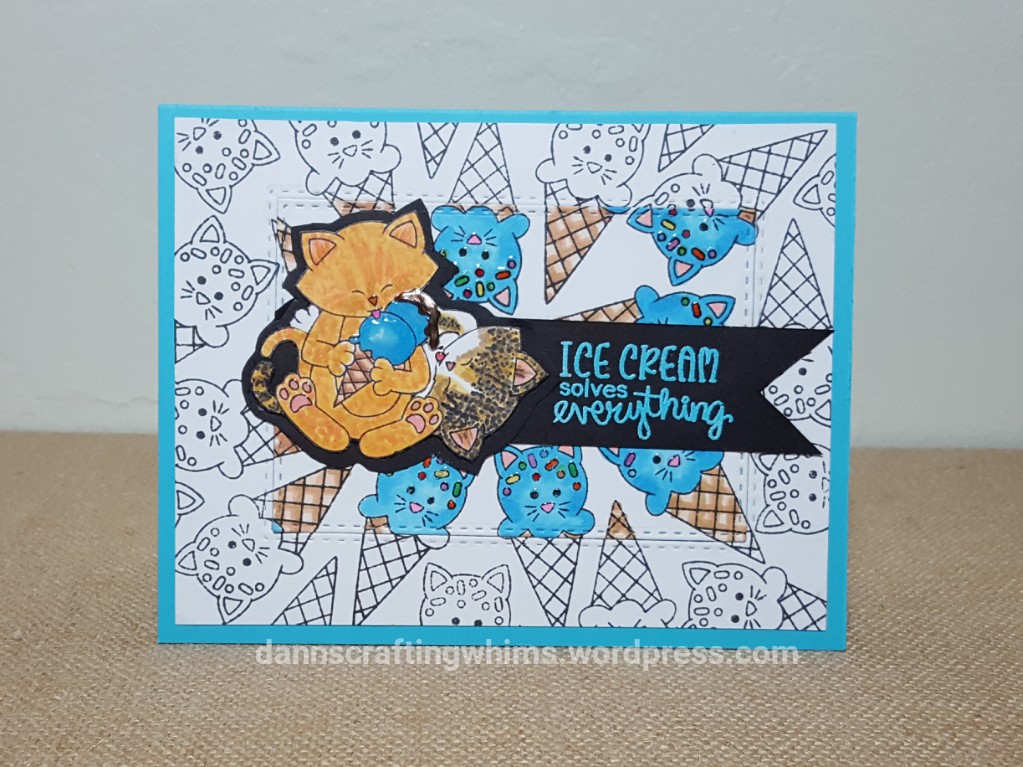
First let me start with a story. A long time ago our family developed a code word for ice-cream. It seems someone in the family was always getting flowers when they were sick or needed cheering up and one day they finally admitted… ‘I sure would be cheered up a lot more if it was ICE CREAM instead of flowers!’ So, from then on whenever this person was sick we’d ask, ‘would FLOWERS cheer you up?’ and if they said ‘yes’, they got ice cream. Now the whole family uses FLOWERS as code for ICE CREAM. It really does make us feel better! Of course if you get BOTH… that’s just a win-win! : ) When I saw this ‘Ice Cream solves Everything’ sentiment I KNEW I had to make up a card for you-know-who! Who knows, maybe it’ll catch on and some day Mirriam-Webster will have a footnote under ‘flowers’ that says “n. – slang for ice cream in the early 21st century’ Hahahaha!

Of course now that I’ve told the story I see that I should have made a sliding sentiment that said FLOWERS solve everything on top and pulls out to say ICE CREAM! Per usual, I have 20/20 hindsight!! Next time!

The card was based on a sketch from the Inky Paws Challenge #77: 

Too bad I finished the card the day AFTER that challenge closed = I needed ice cream to ease the disappointment! Just look at these two darling kitties sharing a yummy ice cream cone!

20180804_170457_wm

(card #1 above) I have always wanted to do one of these backgrounds where part is colored and part is b&w, so decided to try that. I find it daunting to try to randomly stamp a background, but I tried a couple on regular paper until I got one that I liked and put it in the MISTI and laid my stamp on top of each place I’d stamped, picked it up and restamped it. I was able to crank out 4 copies in relatively quick time.

I didn’t want to cover up too much of the background, so, to make the kitties licking their ice cram cone stand out, I cut out some black paper just a bit larger than they are and put it behind them (I had already put the foam underneath them to pop them up, so the black shadow is down on the card base, making it ever more shadow-y.) Glossy Accents and Liquid pearls help the ice cream look more realistic.

Since the current Monday Challenge at Simon Says Stamp is Sprinkles & Splatters, 20180813_SSm I really wanted the sprinkles to pop, so added Nuvo Drops to them and to the kitty noses, tongues (love those cute little lapping tongues!!) and paws. To get Mrs. Calico Kitty’s tail in reverse, I just traced the back side of the stamped image on a light box.

Making the kitty cone: I was in JoAnn Fabrics when they had their 75% off sale and found these cute beads… I thought looked like kittens (they say they’re mice so I added a more kitty-like nose and mouth with a Sakura Identi pen, which stayed on the ceramic (whereas the Sakura Pigma Micron whisker extensions I’d done wiped off the next day), and some pink to the inner ears with a Copic) They reminded me of the kitty cones on my card, so I went looking for something that would look like a waffle cone. I found a Utility Cotton Fabric called, amazingly, Waffle Weave! I drew a semi-circle on a piece of tagboard from a cereal box and cut it out, then cut the fabric slightly larger, and then glued it to the tagboard, folding the edged over and gluing them to the back side. Then I curled it into a cone and glued it together. Once dry, I colored in the debossed waffle squares with a Copic marker. Using a headpin, I made a loop at the top of the kitty and hot glued it in place and hot glued the kitty snuggled inside the ‘waffle cone’. I added some pearlescent seed beads to make the kitty cones hang lower than keys and added a couple of pawprint charms and they were good to go.

I recently told my friend that I remembered after my first day of school, mom would always take me to DQ and that gave me something to look forward to all day… Yep, ice cream solves the tedium of that interminable long first day of school! So I decided to make another card and keychain for my friend’s daughter for her first day of school this week. They had ice cream cones after her first day of school, too! A great tradition has started!! That fits perfectly with the Simon Says Stamp Wednesday Challenge for this week: Back to School.

Back to School is also the theme for the current MarkerPoP! Challenge #138  This time I used fancier beads on her keychain and another I made for someone else:

Aren’t those kitty cones just darling? I love that they match the stamps!!

The CURRENT Inky Paws Challenge (#78) is Summer/Beach.  

Since I had more backgrounds with my summer ice cream, I kept on doing cards with that same layout from the previous Inky Paws Challenge. As I’d used the new Finesse alcohol-proof dye ink by Spectrum Noir to stamp the backgrounds, I wanted to try using alcohol inks on them and decided to try Spectrum Noir basics and Copics. FYI, they both worked fine and the Finesse ink didn’t bleed at all.

The Spectrum Noir sheet was a bit darker than I wanted, so I decided to use vellum over most of it. To take a break from coloring, I left this kitty white.

(Card #2 above) Can’t quite place that tag die? I wanted a nice fishtail tag, but the only one I had (Spellbinders Decorative Swallowtail Tags) was too tall, so I snipped it down and ended up with a leftover decorative accent for another project…

20180812_185625_wm

For the Copic background, I die cut it and an uncolored sheet together at the same time so they’d be cut exactly the same and made two cards with the partially colored technique…

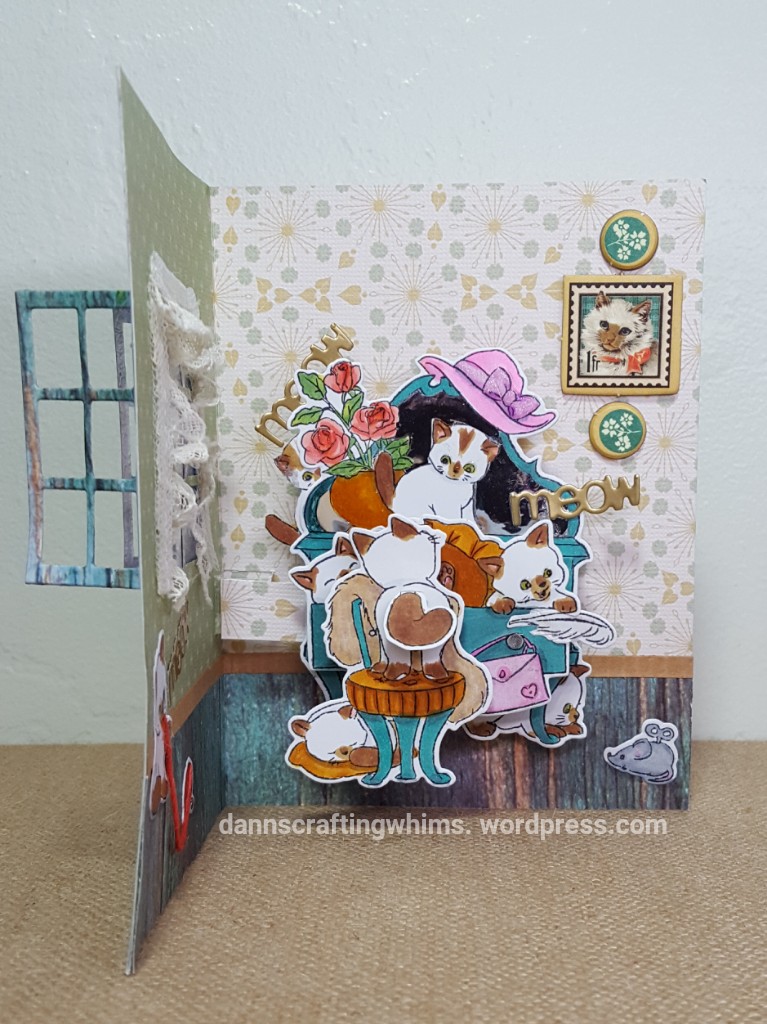
(Card #4 & 3 above) These will make nice little gift sets!

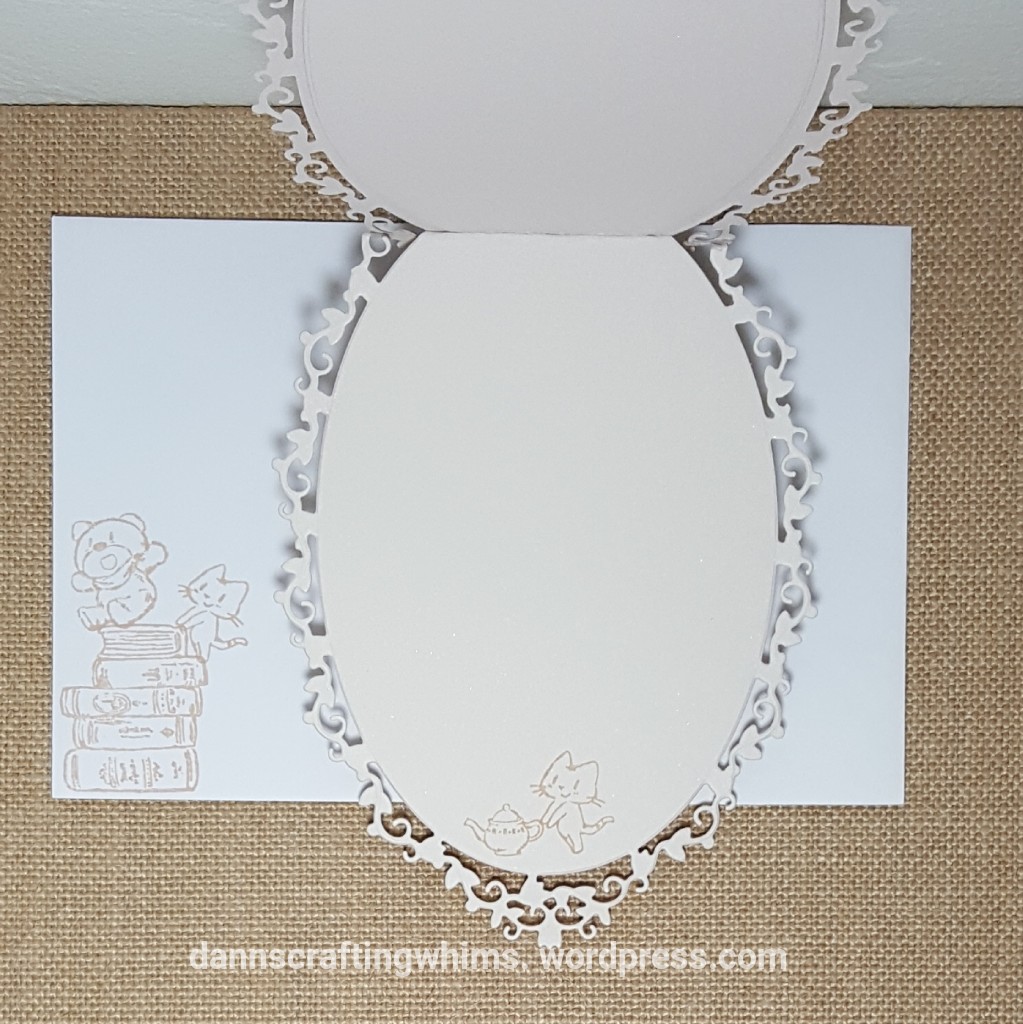
On the inside and backs of each card, I used a light ink nearly matching the cardstock for a watermark stamp. It’s so light the camera can barely pick it up, but it can be seen IRL. That said, I will admit that the first one I got so enthusiastic in writing that I wrote over the stamped image forgetting it was there, so it is VERY light. lol! I think next time I’ll do it a smidge darker! The inside has a kitty with a giant 4 scoop cone and says “You make life sweet!” I hesitated to show you this but now it’s a funny story so here we go…

Yeah, I don’t blame you if you can’t see it! The back has two kitty cones and says: “This card was handmade by” leaving room for my signature logo. (I really need to get that made into a stamp some day!)

I saved the best for last… I’m hoping my coloring on this pair reminds you of two famous kitties… can you guess their names?!

Hint: >^.^< N—–   and >^.^< H—– (btw: I love how the light hits that cone making a white streak… Note to self: next time draw in a white line just like that!)

Supplies – Cards:

  • Newton’s Nook Design Cat Treats & Newton’s Summer Treats stamp sets
  • Spellbinders Card Creator A2 Matting Basics A dies (first card)
  • Spellbinders Decorative Swallowtail Tags (second and third cards)
  • Simon Says Stamp Stitched Rectangles (third and fourth cards
  • My Sentiments Exactly Back of Card Set
  • Spectrum Noir Finesse Alcohol Ink Proof Dye Ink – Flagstone
  • Spectrum Noir Aqua Blend Pencils (first card only): Agean Blue, Anthracite, Asphalt, Beeswax, Black Umber, Cantaloupe, Chrome Orange, Fossil Grey, Honeycomb, Hyacinth. Persimmon, Petunia, Plum Red, Primrose, Sky Blue, Sorrel, Tobacco, and Watermelon
  • Tonic Studios Nuvo Crystal Drops – Gloss: Crushed Grape, Ebony Black, Ripened Pumpkin (first card only)
  • Tonic Studios Nuvo Glow in the Dark Drops – Neon: Apple Sour, Banana Split, Shocking Pink (first card only)
  • Spectrum Noir Basics (second card only): Blush, Bright Orange, Canary, Cerulean, Emerald, Hydrangea, Ivory, Muted Brown, Natural Brown, Red
  • Copic Markers (fourth card only): B02, 24; C5, 7;  E00, 11, 23, 25, 74; G05; R29; RV02, 20; V15; Y13; YR07
  • Tsukineko Versarmark Ink
  • Stampendous Beach Set: Sky Embossing Powder (all except third card)
  • Inkadinkado black embossing powder (third card only)
  • Ranger Inkssentials Glossy Accents
  • Ranger Liquid Pearls – Dark Chocolate
  • Core’dinations cardstock: Black, Blue & White
  • Scotch adhesive roller
  • Aleene’s Original Tacky Glue
  • Misc. foam adhesive squares (first card); sequins & vellum (second card)

Supplies – Keychains:

  • Darice Ceramic Mice (JoAnn)
  • Joann Fabrics Utility Cotton Fabric: Waffle Weave
  • The Jewelry Shoppe Ball Point Headpins
  • Beadalon Satin Silver 7 Strand Stringing Wire & #2 crimp beads
  • Misc. iridescent seed beads (first two)
  • Various beads, including: Millifiore glass beads, Czech glass cathedral beads , Seabreeze glass donuts, and Hematite rondelles…
  • Copic Markers: E31 & RV34
  • Sakura Identi pen – red
  • Aleene’s Original Tacky Glue
  • Hot glue gun
  • Misc. Cereal Box tagboard

I’m playing along with the following challenges – click on any one of them for more information on how you can join the fun:

Thanks again for the kind comments you guys always leave… it’s always a tread to read them!

~D.Ann

.

p.s. any ads on this page are placed by WordPress and are not endorsed by me.

p.p.s Owning yet another oops… the back of one card managed to get into some of that Liquid Pearls Chocolate and Glossy Accents splattered and smeared across it. I just added a note around the stains: “It wouldn’t be realistic without a little chocolate stain and cat spit, would it?!!” : )


Morel Mushrooms and Power Poppy Thanks So Mush Card

Hello and welcome back!

I have been anxious to share this fun card and story with you and am happy I finally have the chance. One evening near the end of April, while in Indiana, we left my cousin’s home after supper and suddenly mom hollered, “stop the car!” Her eagle eyes had spotted some morel mushrooms alongside the road. These delectable delicacies are a favorite of ours, but have a short season and usually require hours tromping through the woods to find, so we rarely get to enjoy them anymore. We counted about 16 right there near the road.

We called my cousin to let her know where they were so she could get them, as they were on her property. Fortunately, her husband (who, I hear, doesn’t particularly care for mushrooms) answered the phone and said, ‘you guys go ahead and take them!’ (Actually, my cousin is such a sweetheart, I know she’d’ve said the same thing.)

As we got out of the car and started hunting, we kept finding more and more and, in a span of just a few short minutes, ended up with a mess of about 46! Best mushrooming EVER!! Thanks, cuz!!

The largest was over 4″! They fried up nicely and were absolutely DELICIOUS!!


Oh, I’m also going to show you a picture of some wild violets up there… in a minute you’ll see why…

Now, how do you thank such a generous sacrifice? Well, Power Poppy has a fabulous morel mushroom stamp that was just perfect:

They look so REAL!! And Becca Feeken’s fabulous Annabelle’s Trousseau die makes a lovely open lacework base for it! I may have to make a whole set of these in the near future!!

Materials used:

  • Power Poppy Wild Mushrooms stamp set
  • Spellbinders Annabelle’s Trousseau die from the Chantilly Paper Lace collection
  • Spellbinders Fancy Tags 3 (with ends snipped off)
  • Core’dinations cardstock: white, purple, kraft
  • Tsukineko Memento dye ink: Rich Cocoa
  • Copic Markers: B02; BV00, 02; C1; E31, 33, 51G02, 82; V17, 25; Y000, 02, 13; YG17
  • Foray Stylemark pen .5mm purple
  • Pebbles, Inc. Pearlescent Chalks – jewel tones
  • Ranger Adirondack Dimensional Pearls: Eggplant
  • Misc. adhesives

I’m playing along with the following challenges – click on any one of them for more information on how you can join the fun:

20180628SSSWiW

I’m glad you stopped by today! Thanks for leaving your encouraging comments!

-D.Ann

p.s. Any ads you may see are posted by WordPress and are not endorsed by me.