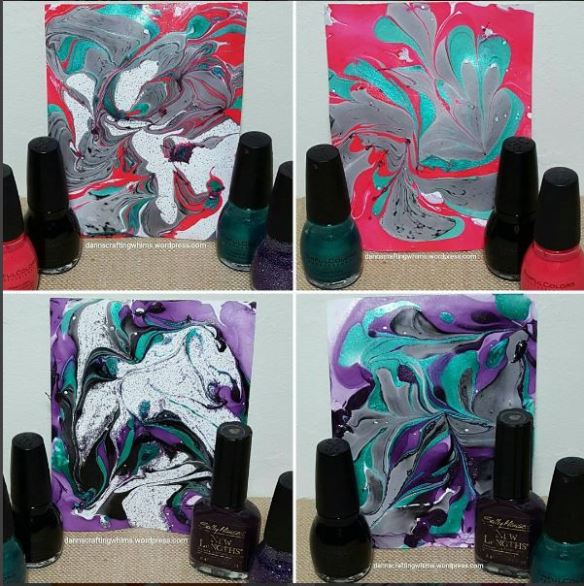
I’m back this evening with a really cool method of paper marbling… using NAIL POLISH! Yep, you read right… NAIL POLISH!
In Papertrey Ink’s Make-It-Monday #277, Lizzie does a fine job of showing you how to do it in the video HERE, so I won’t waste your time with more, except for these three tips:
- Make sure to use gloves and protect around your working area.
- I found it easier to drip from the bottle with the help of the applicator rather than from the applicator, which took too long.
- Make sure to have plenty of paper towels or a dedicated craft mat to lay your wet marbled paper on to dry.

What beautiful DIY backgrounds! They’re shiny and yet pliable, not hardened to the point of breaking.

Adding a polish with glitter tended to spread the colors away from the glitter, for a different look.

These would make great cards to give a special gal along with a manicure kit!

For the ones on black card bases, I went back to old corner punches to decorate the inside and make room for writing a message. Unfortunately, the embossing is so light, I couldn’t get it to show in a picture.

Supplies used:
- Papertrey Ink – Wonderful Words: Love die
- Fiskars Framed in Love Border Corner Punch
- Core’dinations Parisian Nights A2 cards and white & black cardstock
- Tombow mono adhesive runner
- Aleene’s Clear Gel Tacky Glue
- Sally Hansen Zesty Ginger Frost nail polish
- Sinful Colors nail polish: Black on Black, Eva So Bright, Frenzy & Jade Kat
I’m playing along with the following challenges… click on any one of them for more information on how you can join the fun:
- Papertrey Ink: Make-It-Monday #277 Nail Polish Marbling
- Simon Says Stamp Monday Challenge: Make Your Own Background
- Simon Says Stamp Wednesday Challenge: For a Special Lady/Girl
- Simon Says Stamp Work It Wednesday February 2017: Green
- Cropstop March Challenge Linky Party #26: Anything Goes (Aleene’s, Core’dinations, Fiskars & Tombow)
I hope to be back soon with a couple more cards. So check back, or subscribe so you won’t miss any, ok?! Thanks for stopping by today!
~D.Ann
.
p.s. any ads on this page are placed by WordPress and are not endorsed by me.

Wow! I never would have thought to use nail polish like this! Great idea to gift a manicure set with one of these marbled cards! This technique would be great to use as masculine cards too! Thanks for sharing your talent in the Cropstop link-up!
LikeLike
Wow – what a fun and unique way of using nail polish. The results are great.
LikeLike
Your backgrounds turned out beautiful. I hope to try this over the weekend and I thank you for the tips/reminders.
LikeLike
Gorgeous!!!!
LikeLike
Tis technique is incredible! I’ll try it! Both your card are beautiful, the effect on your background is fabulous! Thanks for joining us this week on Simon Says Stamp Monday Challenge Blog! Barbara
LikeLike
Stunning collection of cards. I just love how this is done, very tempted to go out and buy some nail polishes just to give it a go. Amazing look
LikeLike
What a great combo of colours with your marbling they make stunning cards.
Thank you for joining us at Simon says Stamp Wednesday Challenge.
Luv
Debby
LikeLike